PayPal now available at checkout
Free US Shipping On Orders $99+
Extended Support Hours! Tuesday to Thursday: 10 am - 7 pm
Previous slide
Next slide
Cane Creek Logo

Tigon Setup Procedure

Recommendations and Warnings

 
  • The eye to eye and stroke measurements of the shock must match what is specified and approved by the frame manufacturer. 
  • It is critical to check for clearance between your frame and shock at all points of travel – Reference Tigon owner’s manual. 
  • Ensure you have properly measured your suspension’s SAG before riding – Riding on a spring that is not appropriate for your body weight can cause SERIOUS INJURY OR DEATH and damage to the bike and shock.
  • Verify that all shock mounting hardware is secure and there is no side-to-side movement – Torque all shock mounting bolts to frame manufacturer’s specifications.
  • Do not exceed 30psi in the RAMP Tube.

Steps:

Overview

Though Tigon features both coil and air components, setup for Tigon more closely mirrors that of a coil shock, than that of an air shock.  

The air in RAMP Tube is effectively a tuning component and the amount of air pressure has little to do with rider weight. In other words – the rider’s body weight is still primarily supported by the coil spring – and any air added to RAMP Tube simply controls the amount of end stroke support and overall suspension behavior that the shock exhibits.  

RAMP Tube Technology


RAMP Tube is a small air spring that works in conjunction with Tigon’s main coil spring to control the shock’s progression, or ramp in spring force. Using a basic shock pump, tune the added support of Tigon by adding pressure to the Ramp Tube.
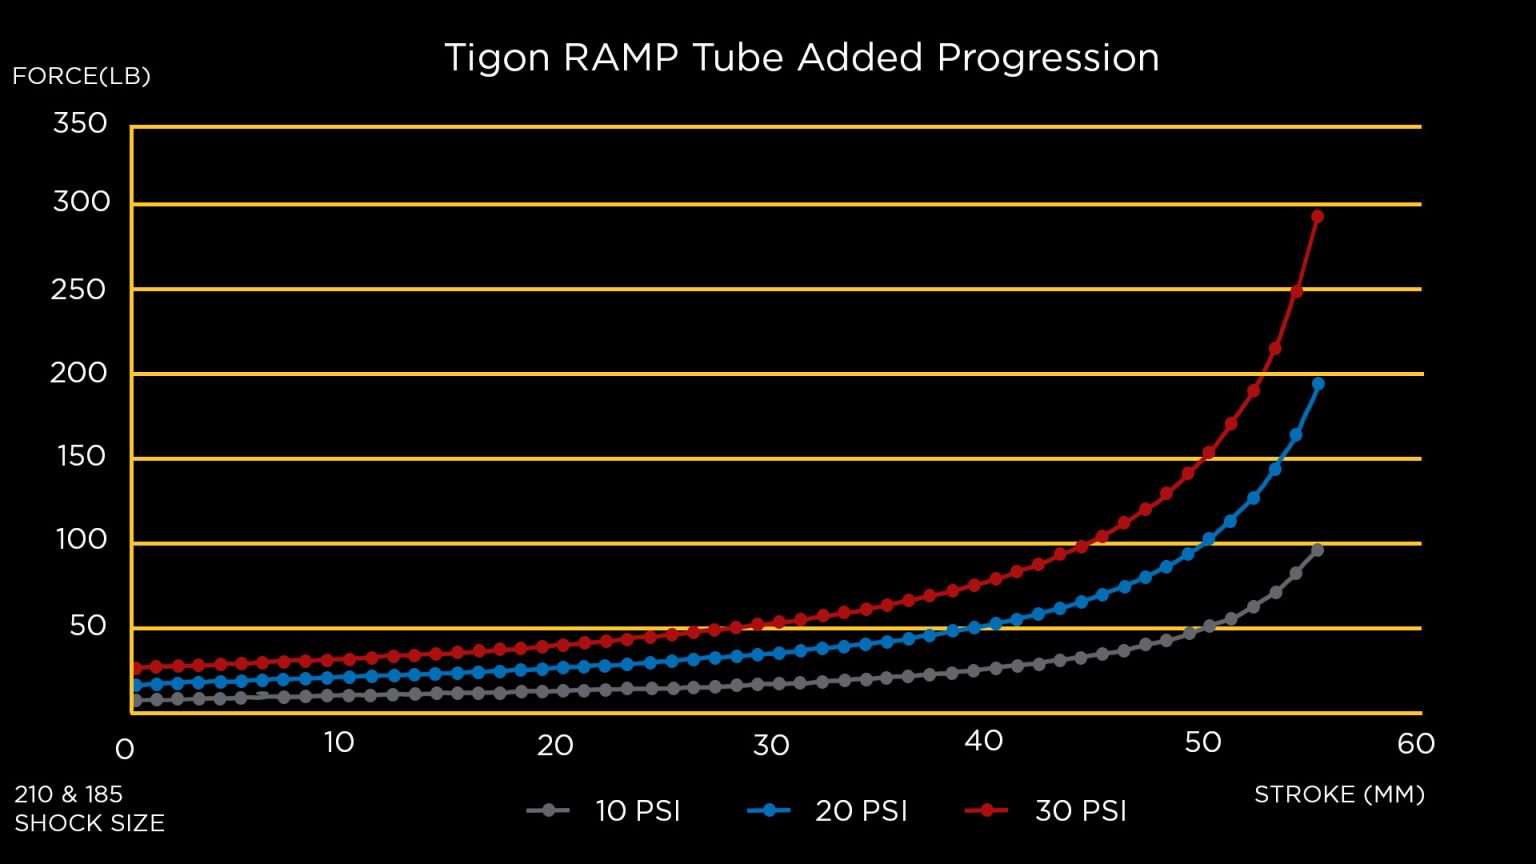
More air in RAMP Tube gives more mid-stroke and bottom out support as shown above. This will make the shock’s spring rate increase more steeply as the shock compresses and provide a generally livelier feel. It gives the shock more of a springboard sensation, making jumping and skipping down sections of trail require less effort.

Choose a coil spring rate

Step 1

  • Use the following formula to calculate your spring rate.

 Rear Wheel Travel ÷ Shock Stroke x Rider Weight = Analytical Spring Rate  

  • Round down to nearest spring rate, to maximize benefits of RAMP Tube Technology.

  • Before installing the spring make sure the correct spacers are installed. 
PRO TIP
COIL SPRING RATE
  • To get the full benefit of Tigon’s RAMP Tube Tech it is recommended to round down if you find yourself between coil spring rates. 
  • Take advantage of Cane Creek’s 30 Day Coil Swap Program when selecting a coil spring.

Coil spring spacer and preload clip orientation

Step 2

  • Verify correct coil spring spacer and spring perch orientation.
  • All 210 standard and 185 Trunnion shocks come with 1x 2mm spacer.
  • All 230 standard and 205 Trunnion shocks come with 2x 2mm and 1x 8mm spacers.
  • Spacers are to be installed before the spring.

Install spring and make sure to reinstall the circlip

PRO TIP
PRELOAD CLIP

Installing Hardware and Shock

Step 3

  • It is critical to check for clearance between your
    frame and shock at all points of travel during installation of the shock.

See your Tigon Owner’s Manual for instructions on verifying frame clearance.

  • The shock eye to eye and stroke measurements of the shock must match what is specified and approved by the frame manufacturer.  
  • Installation of the shock requires the use of the
    appropriate hardware for your specific frame.

  • With the appropriate hardware installed to the shock eyelets, mount the shock to the frame by first inserting the mounting bolts. Do not force the shock in place if there is any fitment interference with the frame.

  • Torque all mounting bolts to the frame manufacturer’s specifications.
  • Ensure all hardware is secure and there is no side-to-side movement allowed at either mounting point.


PRO TIP
SHOCK INSTALLATION
  • Verify that Tigon is fully extended before adding preload – This can be achieved by simply setting preload with the bike in a work stand (both wheels off the ground). 

Set Sag & Preload

Step 4

  • Set sag with 0 psi in RAMP Tube  

  • Must have 1 full turn of preload (minimum 1 full turn with the shock fully extended)  

  • Increasing the preload will increase the starting spring rate of the coil, as well as increasing ride height and reducing sag.

    • To increase the preload on your spring, turn the spring preload clip clockwise (ideally, no more than three full rotations).
  • Reducing the preload will decrease the ride height and increase sag.
    • To reduce the preload on your spring, turn the spring preload clip counter-clockwise. 


PRO TIP
SAG & PRELOAD
  • If less than 1 full turn of preload engagement does
    not yield enough sag, you will need to change to a
    lower spring rate. Conversely, if you require more
    than 3 turns of preload to reach your desired sag, it is
    likely that you can achieve better performance from
    the shock with the next spring rate up

GO RIDE - Want more support? Just add air!

Step 4

  • With your sag set and RAMP Tube adjusted to 0 psi – Go ride a familiar trail that is repeatable and has features typical of your preferred riding terrain.

  • Specifically take note of any harsh bottom outs.

  • If you want more support – Begin adding air to RAMP Tube. Add 5-10psi at a time to tune desired support.

RAMP Tube = 30 PSI MAX

  • Re-check sag after adding desired air pressure, adjust coil preload accordingly.

PRO TIP
RAMP TUBE
  • If 30PSI does not achieve enough bottom out support, increase coil spring rate and/or add additional high-speed compression damping.

Damper adjustments

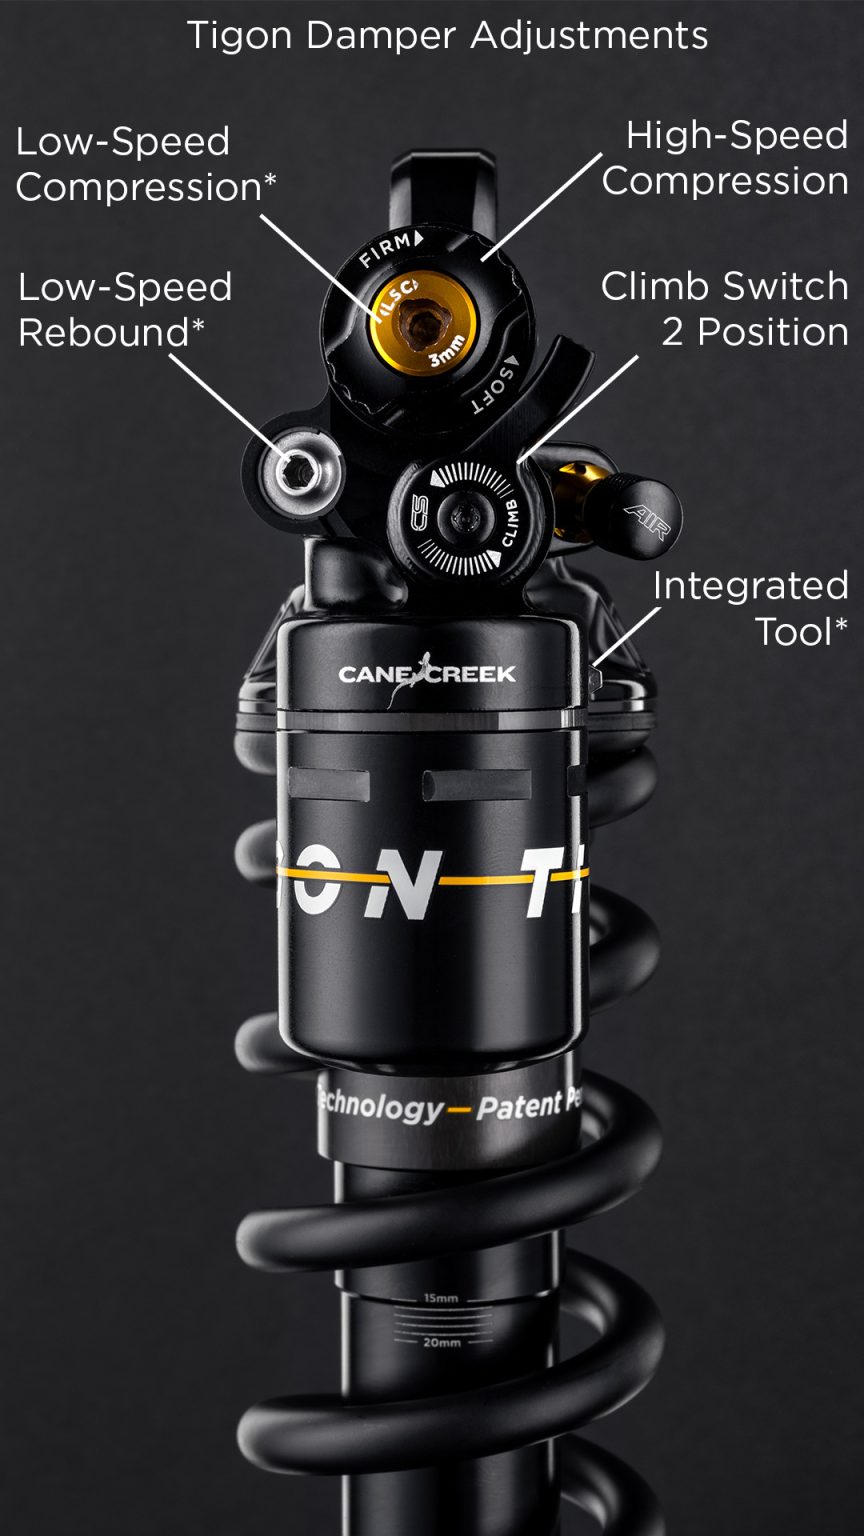
Tigon Damper Adjustments

Step 5

  • Verify that coil spring rate and RAMP Tube pressure are correct before focusing on damper adjustments.

  • All Cane Creek rear shocks are hand assembled and ship with their damper adjusters set to Factory Neutral (middle of the range). We encourage you to personalize your tune and experience the full range of tuning on Cane Creek Twin Tube shocks offer!


    Because no two riders are the same, Tigon’s damper adjustments include: 

    • High-speed compression  
    • Low-speed compression*
    • Low-speed rebound*
    • 2 position Climb Switch 

    *Adjusted with integrated 3mm allen wrench  

  • See DB Rear Shock Tuning Guide Page for an in-depth look into Cane Creek’s independent damper adjustments.

PRO TIP
INDEPENDENT ADJ.
  • When tunning suspension rely on spring rate (Coil) and progression (RAMP Tube) adjustments for major setup changes. Then use the independent damper adjuster to fine tune your suspension
  • Don’t attempt to make any damping adjustments or changes until you have set accurately SAG  

Sign Up To Get 15% Off Your First Order!

Subscribe

* indicates required
Discipline(s)