PayPal now available at checkout
Free US Shipping On Orders $99+
Extended Support Hours! Tuesday to Thursday: 10 am - 7 pm
Previous slide
Next slide
Cane Creek Logo

Hellbender 70 Visco | Press-fit Headset |
Installation Guide

ZS (Zero Stack) Upper & Lower Hellbender 70 Visco Headsets

Required Tools

  • Headset Press
  • 1.5in Crown Race Setter (req. only for Lower Hellbender 70 Visco installation).
  • Star Nut Setter
  • Dead Blow Hammer
  • Metric Allen Wrenches (3mm-6mm are the most common for this installation)

Recommendations and Warnings

The Hellbender 70 Visco is a Press-fit headset assembly and are only compatible with press-fit style headtubes. Press-fit head tubes have an open bore, with no molded or integrated races inside the head tube.

Ensure that you have the correct size headset for your bike’s head tube dimensions. If you are unsure, you can read our article, Everything You Need To Know About Headsets or you can ask your local bike shop.

Always set the preload on a Hellbender 70 Visco to 2.5-3.5 N-m

Note: Upper headset assemblies are not compatible with smooth finish steel steerer tubes. To function properly there needs to be adequate friction between the headset and steerer tube.
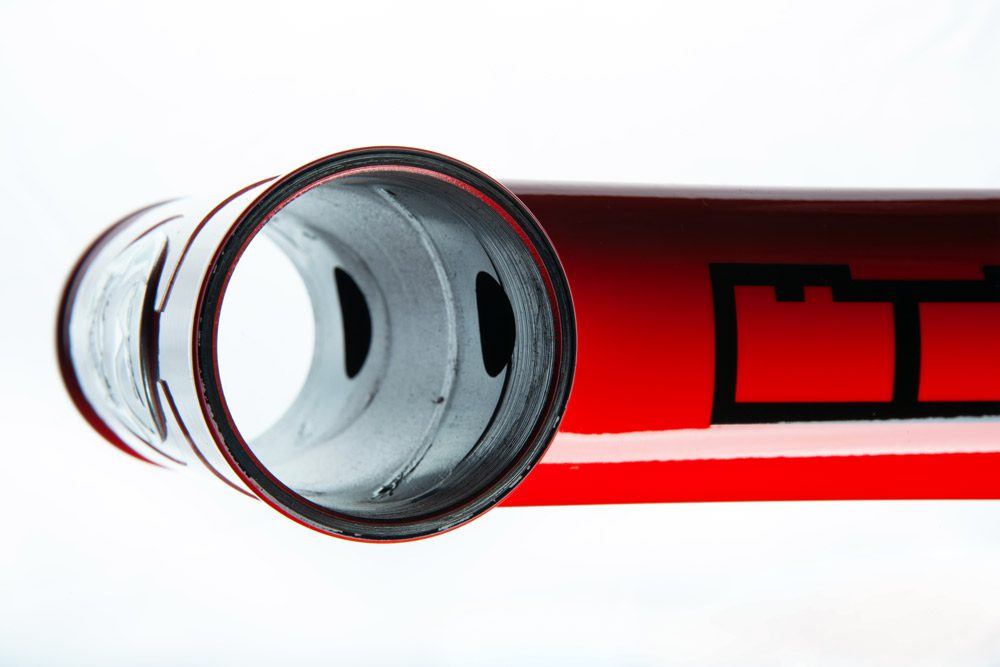
Bare Press-fit Headtube
Open Bore, Press-fit Style Headtube

Glossary of Terms (General)

  • Preload Bolt – The bolt that passes through the top cap and threads into the fixed insert (star-nut or compression plug) inside the fork steerer tube.
  • Top Cap – The top cap is the cap that rests above the stem or upper spacer. It has a hole in the middle that the preload bolt goes through that allows you to tighten and secure (preload) the headset together.
  • Preload – To preload the headset simply means to apply load to the headset bearings in order to keep the system snug and secure. If the bearings are loose, the bearings and headset parts could wear prematurely.
  • Star Nut – A fixed insert that is installed inside the fork steerer tube. The star nut is what allows the headset components to be pulled into place inside the head tube.
  • Compression / Expansion Plug – A compression plug is an expandable insert or wedge that is installed on the inside of carbon steerer tubes – this compression plug is what the preload bolt will thread into.
  • Upper Bearing Cover Assembly – Below the stem or spacers, there is a bearing cover assembly – a cover and seal for the upper bearing, and a split compression ring.
  • Compression Ring – The compression ring interfaces with the upper bearing and steerer tube, which helps keep the steerer tube centered in the headtube.
  • Steerer Tube – The steerer tube is the tube that is attached above the fork lowers or fork blades. The steerer tube goes through the head tube and headset and is what the handlebar stem clamps onto. 
  • Crown RaceThe crown race is an angled surface, or race, that interfaces with the bottom bearing.

Steps:

Prep The Frame

  • Make sure the headtube is free from any debris, and wipe a layer of grease around the top and bottom head tube where the headset cups will contact the head tube. You can also apply grease to the contact surface of your headset cups.

Press In The Headset Cup

Do Not Remove the bearings or damping shims before attempting to press in the Hellbender 70 Visco headset cups.

The Cane Creek Hellbender 70 Visco does not require the Headset Installation tools that take the place of the bearings while pressing the cups into place.

Using a headset press – Press the cups into place while ONLY PRESSING DIRECTLY on outer lip of the cup – labeled “PRESS HERE” 

This Process is the same for both Hellbender 70 Visco Upper & Lower assemblies 
  • Identify the correct pressing locations on the Hellbender 70 Visco’s cup before you pressing the headset into place.
  • If installing a complete headset assembly – We recommend pressing in one cup at a time. You can start with the upper cup.  Prep the upper headset cup with grease.
  • Orientate the correct pressing locations on the Hellbender 70 Visco’s cup to mate up with the flat surface of the headset press. Slide your headset press through the Hellbender 70 Visco cup (NO HEADSET CUP INSTALLATION TOOLS NEEDED) and headtube, and bring the bottom press collar up against the bottom headtube.
  • Begin threading the press tool handle clockwise, all the while ensuring the cup is going in straight.  If the cup starts to press in crooked, you should stop, get realigned, and press the cup into proper position.
  • Ensure there is no visible gap between the headset cup and the top of the headtube. 

Install The Crown Race

In some cases, your fork may have an integrated crown race, where no press-on crown race would be needed. Integrated crown race forks will have a molded race on the base of the steerer tube. If this is the case your fork is not compatible with the Hellbender 70 Visco ZS56 Lower Assembly.

Hellbender 70 Visco Lower Assembly uses a proprietary crown race – Other crown races are NOT COMPATIBLE  – MUST USE the provided crown race. 

If you need to remove the old crown race, you should use a Crown Race removal tool. Park Tool makes a great Crown Race removal tool and they have detailed instructions on how you can remove your old crown race.
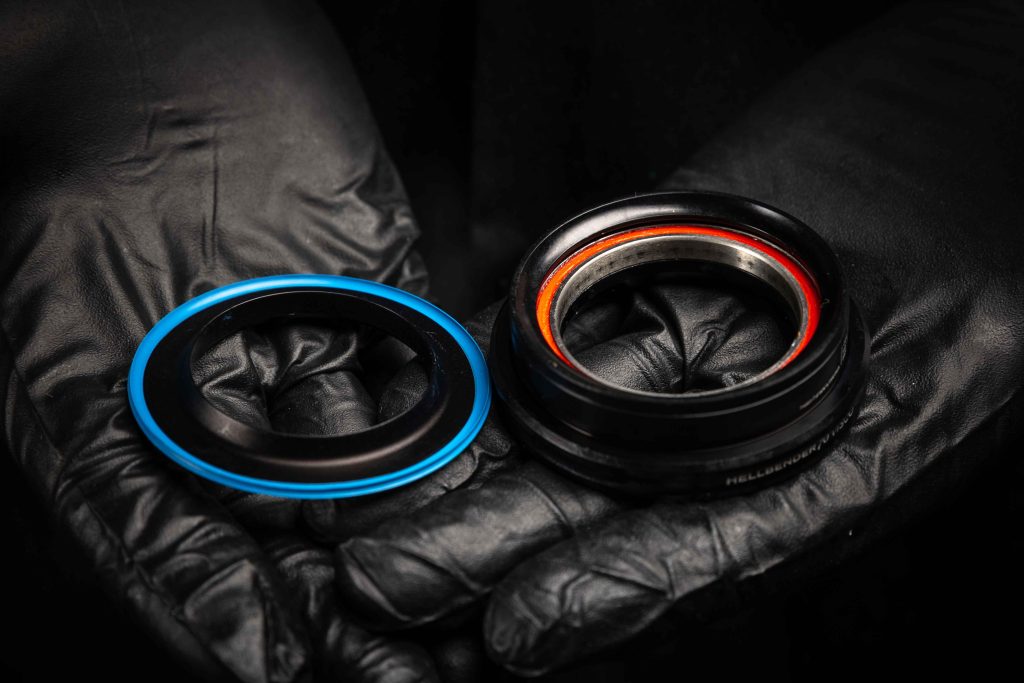
Only Use Provided Crown Race with Hellbender 70 Visco Lower Assembly

  • Make sure the fork’s crown race seat is free from any debris, and apply a layer of grease around the crown race seat.
  • Slide the crown race down to the fork’s crown race seat, and place the appropriate crown race installation tool on top of the crown race in the proper orientation.
  • Take the crown race setter and slider it over the fork steerer tube and place it on top of the crown race and crown race tool.  Make sure the crown race is sitting straight on the crown race seat.
  • Take the dead blow hammer and pound down on the crown race setter until the crown race sits flush with the base of the fork. We do not recommend placing the fork on the ground to do this to prevent damage to the fork blades / lowers.
  • Ensure there is no gap between the crown race and the bottom of the steerer tube.

Install The Star Nut (For Alloy Steerer Tube)

If your fork steerer tube is already cut to length, and has a star-nut or a compression plug installed inside, then you can skip this step.  If you need to cut your fork steerer tube to length, you can consult Park Tool’s Fork Steering Column Length And Sizing Guide

  • Take the star nut and line it up with the star nut setter tool to be installed in the steerer tube.
  • Take the dead blow hammer, and pound down on the star nut setter tool until you can’t pound it down any further. Check the inside of the steerer tube to make sure the star nut went in straight.

Install The Compression Plug (For Carbon Steerer Tube)

If your fork steerer tube is already cut to length, and has a star-nut or a compression plug installed inside, then you can skip this step.  If you need to cut your fork steerer tube to length, you can consult Park Tool’s Fork Steering Column Length And Sizing Guide

  • Apply grease or carbon paste to the compression plug based on the manufacturer’s instructions. For the Cane Creek Ancora, use grease on the non knurled surfaces. (You do not need to apply carbon paste to Ancora’s knurled surface).
  • Insert the compression plug into the carbon steerer tube.
  • Thread the expansion bolt clockwise until the compression plug begins to get snug and stay in place.
  • If specified, torque the expansion bolt to the correct rate.

Preload The Headset

  • Take the top cap, slide the preload bolt through it and prep the lower threads of the bolt with a little grease.
  • Hold onto the fork with one hand, and with the other hand loosen the steerer tube clamp bolts you tightened earlier to keep the fork in place. Do not let go of the fork.
  • Take the top cap with the preload bolt and rest it on top of the upper spacer or stem and begin threading the bolt into the star nut or compression plug until everything starts to snug together and there is no lateral play that is easily detected.
  • Important! This bolt is the bolt that will adjust the amount of preload that is applied.


  • Always set the preload on a Hellbender 70 Visco to 2.5-3.5 N-m


  • A good rule to practice is when you reach down to your handlebar spacers, then you should not be able to turn them easily by hand.
  • Line up the stem so the handlebars will point straight, and make sure to torque down the steerer tube clamp bolts according to the manufacturer’s instructions.

How Much Preload Should Be Applied?


Always set the preload on a Hellbender 70 Visco to 2.5-3.5 N-m


  • If there is too much preload, then your handlebars will not turn easily. If your bike is in the repair stand with the front wheel positioned lower than the rear wheel, and you turn the handlebars to one side and they do not return to center on their own, there is too much preload
  • If there is not enough preload, then you will have play between the steerer tube and the headtube – you can check this by setting your bike on the ground, grabbing the front brake, and rocking the bike back and forth. If there is play, you should definitely feel it, and you can also visibly see the play in the gap between the bearing cover and the headtube when you rock the bike back and forth.

Damping Cartridge Replacement

  • Cane Creek offers Pre-Tuned / Replacement Damping Cartridges for the Hellbender 70 Visco
  • Find replacement Cartridges here – Or reach out to our Rider Engagement Team  

Sign Up To Get 15% Off Your First Order!

Subscribe

* indicates required
Discipline(s)